


As the Director of Social Media at the Langley Pride Society, I’ve created a lot of graphics. I was responsible for their logo, their website, and their social media, but I am also responsible for creating “Mingle Bingle” sheets for our get-togethers.
The name Bingle Mingle comes from the original title of “Mingle Bingo”, and we just kept saying it incorrectly. The idea is that these bingo sheets contain prompts that you can ask people about, for instance one of the blocks might say “A person with the same eye color as you” and so you would go around the party and find someone witht the same eye color. Of course, we had fun with it and added prompts like “A person on the same anti-depressants as you”.
Anyways, here’s a small tutorial on how I created some custom mingler bingo sheets using Google Sheets and Affinity Publisher.
The Challenge
For the Bingle Mingle sheets, I wanted to accomplish a few things
- No sheets were the same as any other
- I want to update the sheets easily
- I want to allow Directors of the Society and friends to add prompts
- I want them to look pretty and be fun
Of course, these presented me with an opportunity to create a complicated Google Sheet, which is a surprisingly fun thing to do.
The Google Sheet
You can take a look at an example sheet here: [Link to Example Sheet]
Tab One: The Prompts
This spreadsheet had two tabs of data. On the first tab, I’ve asked my friends and colleagues to fill the sheet up with mingler questions, one per row. Filled with FUNdamental truths about large swaths of the population, like:
- Someone who has seen the 1998 film Mystery Men
- Someone addicted to their vape
- Someone who hides their League of Legends addiction
- Someone who can do a backflip but only if everyone is cheering
You’ll want to add as many prompts as you can! For my example I created 75 prompts, which I would say is a good amount of prompts to ensure that each sheet feels unique. Of course, they don’t have to be as antisocial as the ones I put forward.
Tab 2: The Data
If you’ve looked at the second tab already, you might have an idea of how I randomized my sheets.
Make sure to use the first row to define the names of your columns. This will be needed when you export your data for use in Affinity Publisher. I named my columns “Starting Row”, “Increment By”, and then “B1” through to “O5”. I skipped “N3” because that will be a free space.
I started by randomizing each and every BINGO box, but I was getting a lot of repeats. I tried to create something that fully randomized each sheet while checking to see if the prompt was picked in a different column, but this was proving to be an exhausting task.
So, I changed tactics. Instead of randomizing each and every sheet entirely, I can pick a random spot to start from, and a random amount to increment by. This is why I recommend so many prompts to fill up your sheet, because at 24 prompts, every sheet is the same and just has a randomized starting offset.
So, to pick which prompt as the Starting Row, I used the following expression:
=FLOOR(RAND()*COUNTUNIQUE(Prompts!$A$1:$A$999))+1- FLOOR ensures that the random number I have generated is always a whole number
- RAND creates a random number between 0 and 1. Example, it might gnerate 0.375258763
- COUNTUNIQUE counts how many unique rows I’ve created in the prompts tab from A1 to A999. The $ is a helpful addition to ensure when using autofill that it doesn’t change the column or the rows being referenced.
- +1 because the expression can return 0, and I want to ensure that never happens.
Then, for the Incremented By column, I used the following expression:
=FLOOR(RAND()*COUNTUNIQUE(Prompts!$A$1:$A$999)/24)+1This is very similar to the earlier expression, but I’ve now divided the total by 24. This is done to ensure that I am incrementing by a total amount that is smaller than the amount of prompts for the entire sheet. This is a shortcut to prevent duplicates by never allowing myself my loop around back to the row I started with. So the math ends up being the amount of rows/the amount of spots in the bingo board.
And now, for each of the BINGO spots:
=INDIRECT("Prompts!$A$"&MOD($A2+COLUMN()*$B2, COUNTUNIQUE(Prompts!$A$1:$A$995))+1)- INDIRECT is a function where you can write a string that would be processed like an expression. This is needed since we are randomly generating the call for each row.
- MOD is short for MODULO. Let’s say you’re grabbing the modulo of 7 and 2. 2 fits into 7 three times, and what you’d be left with is 1 extra. Modulo figures out how many “extra” digits don’t quite fit into the other. I use this to ensure that when I hit a number that’s larger than the amount of prompts, it starts looking from the beginning plus whatever extra number is calculated. So I’m grabbing the starting point (A2) and adding a numerical value of whichever column we’re in (COLUMN) multipled by the amount we’re incrementing by (B2). That value is compared to the total number of prompts.
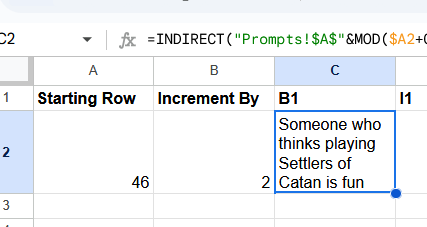
Now, select the bottom right corner of this cell (which will be highlighted with a blue dot) and drag it all the way over to the right until you’ve autofilled all 24 of the columns needed to fill out the BINGO sheet.
Let’s do this again, but now we’re highlighting the entire first row and dragging it down. When we drag it down, do so by the amount of sheets you want to create. We’re expecting about 50 people at our get-together, so I’m dragging down to row 51.
If everything worked out correctly, you should now have random prompts filling out each and every BINGO cell. ANy time you update the prompts on the first tab, it will update the second tab automatically!
Exporting the Data
Now, let’s export our data into something that can be read by Affinity Publisher.
Click File > Download > Tab Seperated Values (.tsv). This will download a TSV file with all the data we need. I chose TSV over other formats because of these advantages:
- XLSX files are actually encoded in a way that is difficult for other softwares to decode. XLSX also can’t be put into Affinity Publisher. I imagine this is to avoid potential licensing issues with Microsoft?
- CSV (Comma Seperated Values) is a popular format, but for many of my prompts like “A human being who, like Garfield, doesn’t like Mondays”, I have added several commas. Since values are seperated by commas here, this will confuse any software reading these values.
- TSV is read by most software the same way CSVs are, but are instead seperated by TABS. Tabs are fairly uncommon and it is unlikely you’ve added tabs to your prompts, so it’s perfect to be loaded into Affinity Publisher.
Adding the Data to a Publisher Project
Im not going to explain much of how to create layouts and designs in Affinity Publisher, as this tutorial is already plenty long. I will however, explain the process by which we Data Merge!
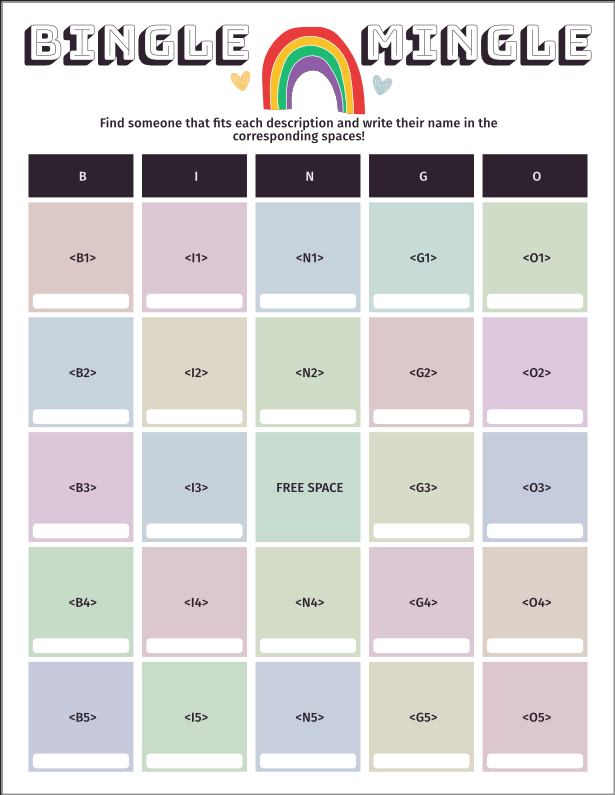
Above is the template I’ve created in Affinity Publisher. One of the notable things is that I’ve ensure each of the texts I want fill out with prompts are named after the column name I gave in the sheet. They also need these brackets around them, for instance, B1 is entered in as <B1>.

Now select Window > Data Merge Manager…. This will open up a new window in Publisher that give you all the options you need. There are a lot of options to mess around with here, but since we are uploading a TSV file, make sure the Delimiter selected is “Tab”.
When your settings are completely filled out, you can click “Preview with record” to look through how your data will appear in these sheets. You can even scroll through the different rows of tyour data to see how each of them look in the final product. Since there are so many variables to update, I find the software sometimes fails to update particular squares. This is fine, and will not reflect in the final version. I’ve troubleshot this by zooming in and out again and that typically tells the software to update it’s visuals.
Also, sometimes the data doesn’t work to associate a particular text area with a particular column. To troubleshoot this, you can open the “Fields” window via “Window > References > Fields”. Highlight your text, and then double click the field that associates with the text you’re going to replace. For some reason I had to do this with every single field!
Once that’s done, you can click “Generate” in the Data Merge Manager window. This will create a new project with a page for each and every row in your dataset. Now you’re done! You can print the project straight from here, or export the project as a PDF! Just make sure to double check all the pages and that all the text fits properly.
All Done!
Thank you for taking a look at this tutorial! I truly hope that you create some really wonderful Bingle Mingle sheets of your own.
Have a great day!
- ❤️ Kerk